Tuesday, July 31, 2012

Marinated chicken skewers

I tend to go for my number one marinade for chicken skewers most of the time since I am always sure of the outcome: tender and deliciously tangy chicken. This time I decided to try something new and wanted to stay away from the flavor I am used to. After a quick research on the Internet I got inspired to make a combination of a few recipes to come up with flavors that would compliment each other.

Verdict? This marinade is a keeper since it produced delicious, very tender chicken...I will be making it over and over again. Do try it and you will see what I am talking about.


Ingredients:

I used these ingredients for 3 big boneless skinless chicken breasts

3 tablespoons mayonnaise (light is fine)
1and 1/2 tablespoon Dijon mustard
1 minced shallot
1 teaspoon dried oregano
1 teaspoon lemon juice
2 tablespoons olive oil
1/2 teaspoon garlic powder
1 teaspoon paprika
1/4 of a bouillon cube
salt and pepper to taste

Mix all the ingredients and marinade the chicken for at least 3 hours in the fridge.

Enjoy!

Sunday, July 29, 2012

Maakouda


The closest thing I can use to describe Maakouda are potato latkes; they are both made out of potatoes and fried. Maakouda is a lot more flavorful than latkes in my taste and I enjoy the contrast between the crispy outside and smooth inside.
This is not the healthiest thing to eat since it's fried carbs :-) but here's my philosophy when it comes to eating well; I'd rather enjoy a small amount of some amazingly delicious food than eat a lot of bland tasteless food. So I keep the frying to a minimum and share anything sweet I make with others or freeze it for when I have company :-)


Ingredients:

5 potatoes
1 onion
2 tablespoons chopped cilantro
1 egg
salt/pepper/cumin

Directions:
Cook your potatoes in some salted water until tender, peel and mash. finely chop the onion and sautee it in a little olive oil. Wait until the potatoes and onion are completely cool then add all the ingredients together.

Heat some oil (it needs to be very hot) prepare a plate with a mixture of seasoned flour (salt+pepper+paprika) and bread crumbs (I use italian bread crumbs)

form a ball with the potato mixture, flatten between the palms of your hands, give it a good coating of flour and bread crumbs and fry until both sides are golden brown. Place on a paper towel as soon as it comes out of the pan.

Enjoy!


Ramadan meals

As I've mentioned on previous posts; the holy month of Ramadan is here and I am enjoying the festive ambiance it brings with it. Even though fasting in the middle of the summer is no easy task but I really enjoy the challenge and spiritual connection it gives me.

During Ramadan we serve a meal at sunset called "iftar" or "ftour" which translates into "break fast" and yes you guessed it! that's when you break your daily fast. This meal includes a lot of variety of food and is traditionally really big but since I have a small family and half of us is not of fasting age :-) I keep the amounts under control; compared to iftars in large families or ones we serve when we're entertaining.

Some items served do not change from day to day and will always be present on the table, and the combination of foods is a little crazy unusual but that's a Moroccan iftar for ya!! Other countries have their own traditions when it comes to the foods served but one thing is for sure; NOBODY misses iftar time :-)

Here are some pictures of some of my iftars served to my little family


On the table: Lamb kabobs/Maakouda (close to potato latke)/fresh veggies/creamy semolina soup/ boiled eggs (don't ask!)/ Ramadan pastries and a nice mint tea.

Other than the usual iftar items; we have here Kefta/baghrir (semolina pancakes)/ cucumber and tomato salad/Sweet rice.


I remembered to take a picture after we started eating :-) I was too hungry lol
On this menu we had a delicious shrimp pizza/Harira soup/beef kabobs/crepes...

Thanks for sharing our iftar!


Friday, July 27, 2012

Refreshing sneaky smoothie

This sneaky smoothie is the perfect way to get some veggies into picky children or even to add a helping or two to your own diet.
You can never tell that it has a veggie by the taste of it because it's soooo delicious and really refreshing.


ingredients: (no exact measurements and you can add any fruit you have)

I use frozen fruit mostly because I always have it in my freezer but if I notice any fresh ones that are getting too ripe in the fruit basket then I throw them in there.

Peaches
pineapples
Strawberries (I added strawberry puree cubes just because I happened to have them)
banana
cucumber (I added half a cucumber)
orange juice

Blend and serve fresh. I tried this recipe with carrots that were finely grated and with canned beets and I find that these 3 veggies work the best with fruit just don't try to add something like broccoli or green beans :-) I can't think of other kinds of vegetables that would work for this smoothie. Also keep the ratio of fruit to veggies in the 80% to 20%.


Bread making 2

After my last post about bread, I decided to give more specific instructions on how to make a perfect batch every single time with plenty of tips.

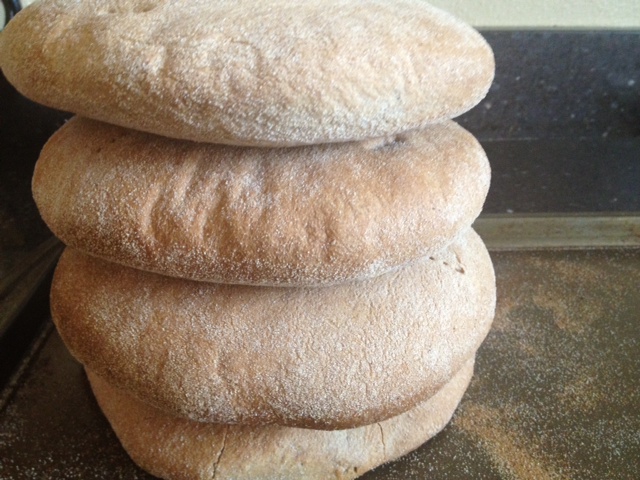
Here's this week's batch


This method gives a very spongy and airy bread with a beautiful crust.

Keep in mind that a good bread doesn't rely on exact measurements and that it's all about the method with which you make the bread. For this bread I used 4 big bowls of white flour (I use a high gluten variety) and 2 bowls of durum flour with 2 tablespoons of  dry instant yeast 1 tablespoon of olive oil and salt (taste the batter to decide how much you need) 1 tablespoon of sugar and enough warm water to form a soft sticky dough.

Directions:
Add some warm water to the yeast to activate it, add the sugar to this mixture and let it rise.
In the bowl of your stand up mixer armed with a hook attachment add flour, salt and olive oil mix and add the yeast mixture.
Add your water little by little until your flour becomes a soft sticky dough, let the machine knead it for 15 minutes on a high setting (I use 6 on my kitchenaid which is the setting before the last one) if you don't have a machine, knead until your bicep doubles in size lol 

cover the bowl with a plastic wrap and let it rest until the dough has doubled in size. TIP ALERT!! to make this process really fast; I put the warmer of my oven on the lowest setting and put my bowl inside.

After the dough has doubled in size, punch it down to get the gas out while it's still on the bowl cover it and let it rise a second time...This is the secret to a very airy bread.

After your dough rises again and this time it shouldn't take long, transfer it to a floured surface and punch it down. shape it into 6 balls or more depending on what size you want. I use fine semolina to help with the stickiness.
 Flatten your balls pretty thin , make a criss cross cut on top using a sharp knife. cover the bread with a clean cloth and a small blanket (baby blankets are perfect) let it rise. Bake in a 375 degree oven for 25-35 minutes. You will have to switch your baking sheets a couple of times while cooking as the rolls placed on the lowest rack will need to be switched out to the top rack once their bottom side is golden and then the baking sheet on the top rack will get a chance to cook on the bottom rack. once all the rolls are golden brown on the bottom, put your oven on the "broil" setting and switch the breads around until al are golden brown and beautiful! This is not as complicated as it sounds and your oven might do a better job at getting everything golden brown without needing to broil like mine does. Once the bread is ready cover it with a clean cloth as this will make the crust not too hard.

Tip: I cook one big batch of bread once a week that way I can have homemade bread every day and to keep bread as fresh as the day I bake it I do what my mother does: Once the bread has completely cooled down I wrap 2 breads at a time in a clean cloth, put them inside a plastic bag and  put them in the freezer.

To use the frozen bread; get it out about 1 hour before use and let it thaw, brush it with a little water on top and bottom (I wet my hand a couple of times and rub it on the bread) bake it for 5 minutes and it will be as fresh as the day you made it. Voila!!

Happy baking

Wednesday, July 25, 2012

Bread making

Bread making is very easy once you have practiced enough but very intimidating if you're not familiar with it...I've been on both sides and I remember when I used to think that it's difficult and requires special skill but after practicing with different methods I found out that you just need trial and error to figure it all out. You start adjusting the amount of yeast and different flour mixes based on you own taste but the base is very simple: Yeast, salt, flour and water...The rest is left to my kitchenaid that does all the kneading for me and that is why I make bread a lot :-)

I am sharing here a few pictures of the different breads I make.

This is a bread made with a mix of Bulgur flour and white flour.


This one here is made with all whole wheat flour


This batch is made with a mix of whole wheat flour and all purpose flour

This is batbout bread which is a bread cooked over a skillet instead of baked in the oven. Here I made the mini version which is excellent for sandwiches

Atkins dieters please do yourself a favor and eat some bread! I can't imagine how sad life would be without bread :-)

Baghrir (semonlina pancakes)

My posts have been and will tend to be very Moroccan for a little while since we are celebrating the holy month of Ramadan and of course this means a lot of traditional foods associated with this occasion. Since this blog is not intended to discuss religion I will spare the details and will just say that it's a month of fasting and spiritual cleansing and the biggest event is the meal served at sunset every day called Iftar.

Baghrir is a traditional pancake that is mostly made out of fine semolina but some recipes include regular flour, it is light and fluffy with an irresistible taste. It is always served with a syrup made out of honey and some melted butter and that's where it gets all the sweetness from as the batter doesn't include any sugar. This pancake is charecterized by the many holes it forms on the surface


Ingredients:

3 cups fine semolina
About 3 cups warm water
1 egg yolk
1 teaspoon baking powder
1 small package active dry yeast
pinch of salt

Directions:
Dilute the yeast in a little warm water to activate it. Add the fine semolina in a blender with the warm water, diluted yeast, baking powder and salt. Mix well and then temper your egg yolk by putting it in a bowl and adding a little warm water to it and whisking. Add the tempered egg yolk to the blender and mix until you achieve a batter that is comparable to pancake mix in consistency. You can add more water if needed as the absorption varies from one semolina brand to the other.

Let the batter rest until it starts bubbling at the surface (about 45 to 60 minutes). Heat a skillet and spread a layer thinner than that of a pancake and thicken than a crepe. Let it cook on low heat on one side only until you can't see any wet batter on the surface. Serve with melted butter and honey syrup.

Sunday, July 22, 2012

Jben (Fresh spreadable cheese)

Jben is a fresh cheese that is usually sold in supermarkets and other specialty stores in Morocco, it has a taste that is a cross between cottage cheese and goat cheese. Since this is an authentic cheese that can't be found in the states, I decided to learn how to make it so I googled the recipe and chose the one that sounded the best.

I love how it turned out; the texture is perfect and the taste is just like I remember it. This recipe is a keeper for me!

Ingredients:

1 measure of whole milk
1 measure of buttermilk (I used 6 cups)
a little salt to taste
1 tsp lemon juice

Directions:

Heat up the milk until very hot but don't let it come to a boil.
Add the lemon juice and salt to the cold buttermilk and mix
Add the hot milk to the cold buttermilk and mix
let it rest for about 1 hour, you will notice that as soo as you pour the hot milk on the buttermilk it will start curdling jut let it set for that one hour so it can finish this process

Here's what it looked like right after I added the hot milk


Collect the solid parts with a mesh spatula and put them in a cheese cloth and let it drain over a mesh kitchen strainer for 2 hours in the fridge.


Store in a closed container in the fridge and enjoy as a spread with honey

Wednesday, July 18, 2012

My Ramadan preparations

Ramadan is almost here and I have been in the middle of getting ready for it...See I don't go small during this time of the year and I don't take any short cuts when it comes to preparing all the Ramadan staples I grew up with. My house has been smelling like warm honey, cinnamon, Anise seeds, orange blossom water and toasted sesame seeds and almonds for a couple of weeks now!

I am sharing in this post some of my preprations but without a recipe for now and I will try to post all the recipes at a later time (Toooo busy!)
It might look like a lot but believe me that it really is not when you consider that I am preparing for a MONTH LONG HOLIDAY!!! Compare to how much preparing we have to do for Christams that is here for 2 days only and you will get my point :-)

I will be posting some of my Iftar tables (breaking the fast meal at sunset) during this month. It is like having a Thanksgiving dinner every night!

These are Krichlat or Grissat which are sweet rolls flavored with Anise seeds


I also made some mssemen which can be served sweet with honey or can be savory and stuffed with some meat as seen on the picture


Briwat which is very thin pastry filled with a homemade almond paste, fried and dipped in honey

Here right before the hot oil bath :-)


I made Sellou which is a very unique pastry that is usually served in a "powder" form and eaten with a spoon or formed into different shapes and enjoyed with a nice cup of tea. It is made with a long list of nuts and seeds and is considered as an energy bar...That's why it's popular during this fasting month and is also served to young mothers druing the first weeks after birth. This one is time consuming and involves a lot of prep so a lot of women shy away from making it because of that.  


And of course Ramadan is all about sharing and I especially love giving away the goodies that are harder to make but are missed the most.


Ramadan Moubarak and enjoy!

Saturday, July 14, 2012

Scallops over pasta

I bought these beautiful scallops during my trip to the fish market, they looked very fresh so I knew that I wouldn't be messing with them too much when cooking. Scallops have a very delicate taste that gets lost when mixed with spices and herbs so it's best to keep it simple.

The exception to the rule is:  if you are using scallops that are less than fresh then they probably don't have that much taste and will need some help so feel free to use a marinade or sauce to flavor them.


Directions:

Wash your scallops and dry them on a paper towel from both sides.
salt and pepper both sides
Heat a skillet; it's very important that it is very hot so that you don't end up with steamed scallops
Add butter once the skillet is very hot to cover the whole surface (about 1 tablespoon)
Sear one side until golden brown and turn to the other side and do the same.
Scallops should never be over cooked otherwise they turn into rubber :-( they are not very cheap so stay close to that pan.

I served my scallops over spaghetti with a delicious pink sauce (tomato/cream) and notice how I didn't pour the sauce over the scallops to preserve their distinct taste.

Enjoy!

Friday, July 6, 2012

Madeleines

Madeleines hold a special place in your heart if you grew up on them, certain foods just have special nostalgia evoking powers and this is deffinetly one of them for me (I have way too many!). The French have definetely left a lot of goodies in Morocco and you can see that influence any time you walk into a bakery and see all the croissants, macarons, petits fours and other delicacies...I spend a lot of time researching french sites for some of my favorite childhood recipes and I usually find what I am looking for on http://www.cuisineaz.com/


Ingredients:
2 eggs
3/4 teaspoon vanilla
1/8 teaspoon salt
1/4 cup sugar
1/2 flour
1 teaspoon lemon zest
1/4 cup butter
1/2 teaspoon baking powder


Directions:

Melt the butter and let it cool
Beat the eggs, vanilla and salt until light and gradually add the sugar while continuing to beat. The mixture should be very smooth and forms ribbons when you lift it.

sift the flour and add it to the mixture while beating lightly. Add lemon zest.
pour the melted butter around the edges and fold it in gently until combined
bake 15-18 minutes at a 375 F degree.

Enjoy!

Wednesday, July 4, 2012

Baked red snapper

I love fish and I try to include it in the menu at least once a week and I would cook it a lot more if a fresh fish market was anywhere near my house.
We made a special long trip to a fish market the other day to get some goodies and I was almost as excited as I would've been in a french patisserie :-) I had to bring this big boy home with me and eventhough my son was concerned about the "organic" looking finished product (head and tail anyone?) he was relieved to know that they are not supposed to be eaten and he actually ended up LOVING it.


Directions:

Clean your fish and make three cuts on each side (makes it absorb the sauce)
Slice some potatoes, peppers.
Make the marinade/sauce: chopped cilantro, garlic, puree of 1 tomato, 1tbs tomato paste, cumin, paprika, salt, pepper, half a bouillon cube, 1 tbs lemon juice.


Place the veggies in the bottom of your cooking vessel, rub your fish with the marinade and place it on top of the veggies. add 2 tbsp of water to the remaining marinade and pour it all over the veggies (fish releases water so don't add more). You can add olives if you prefer. Decorate your fish with sliced lemons and tomatoes.
bake in a 375 oven for 45 minutes or until done (depends on the size of your fish)

Right before going in the oven...


...And after...Yummy!

Stuffed kefta

Happy 4th of July!!

Burgers and hot dogs are great and all but this 4th of July I decided to make something a little different so I gave these stuffed sliders a go and I didn't regret it. The spices used on the burger are the standard moroccan mix that make a burger become a kefta :-) but the twist is that each slider was stuffed with a little feta cheese and a quarter of a boiled egg Yes it sounds odd but it is delicious!!


And here's a look at what's inside


directions

mix the hamburger meat with chopped cilantro a very finley chopped onion (I grate mine) paprika, cumin, pepper and salt.

Shape into balls and flaten each ball in the palm of your hand, add a little feta cheese to the center and top with a quarter of a boiled egg. Bring the sides of the circle that you have formed to the middle and shape your kefta into the shape shown in the first picture. cook on the grill.

We had some cranberry/sprite to drink and I added some of my strawberry ice cubes that were very fit for the occasion.


Stuffed vegetables

To look at this blog you would think that I do a lot of baking and not enough cooking but that couldn't be further from the truth! I actually cook a LOT more than I bake but I find that baked stuff looks a lot prettier in pictures :-) plus I use this blog to save my recipes and I am never worried about saving cooking recipes because I eyeball everything and I can say that I am very experienced in that area...Baking however is not as easy to eyeball and is more of an exact science so I always hurry and register a succesful recipe before I lose it...That's my excuse and I am sticking to it!!

I made some stuffed vegetables last week that came out really delicious and I remembered to take a picture before serving them and I am glad I did because they were gone as soon as they hit the table lol my husband and kids loved this dish so much that I was wondering why I hadn't made it for months.


My kids only especially love the stuffed potatoes


I find that stuffed peppers cooked in the oven come out too crispy and if you let them cook until tender the stuffing becomes overcooked and dry so the best way for me to cook them is in a pressure cooker with some tomato sauce.

Directions:

Mix some chopped cilantro with 1 grated onion, paprika, cumin, salt, pepper and some cooked rice. Mix well with the hamburger meat and set aside in the fridge.

Using a slim knife, empty the inside of the veggies and stuff with the meat mixture.

Heat some canola oil in a pressure cooker and add a thinly sliced shallot (or onion) once the shallot has wilted add 2 fresh crushed tomatoes add salt pepper cumin paprika half  bouillon cube and a little saffron for color.

Add a few tablespoons of tomato sauce and a little water and place the vegetables in the pressure cooker. Cook for 25-30 minutes.

Enjoy!