Showing posts with label Main course. Show all posts

Tuesday, April 16, 2013

Moroccan Shrimp over Rice

I am a big seafood lover but shrimp is a bit of an exception for me; I don't hate it but i don't really love it the way I like fish or oysters...This recipe is one of very few that transform shrimp to something I really enjoy. I prepare it using shrimp that's still in the shell for two reasons; it produces a lot of flavorful juices for the sauce and it's so much fun to get messy with it when it's served. Of course you can take the shells off before cooking if you're serving it to guests.


Ingredients:

20 jumbo shrimps
2 minced garlic cloves
3 tbsp chopped cilantro
1 tbsp butter
salt/pepper
1/2 teaspoon cumin
1/2 teaspoon paprika
1 tbsp olive oil
Saffron
4 to 5 tbsp water

Rice (according to preference)

Directions:

Cook the rice in some salted water until soft and let it drain. Save on the side
In a sauteing pan add shrimp and all ingredients (except for rice) and cook on a low heat until shrimp is cooked. Don't forget to add the water in the beginning of the cooking process and if more is needed add a little at a time, the goal is to have cooked shrimp and enough sauce left for the rice.

Remove the cooked shrimp from the pan and set aside, add your rice to the pan and mix around until it absorbs all the sauce that is left behind.

Serve Shrimp over rice and enjoy!!

Saturday, November 17, 2012

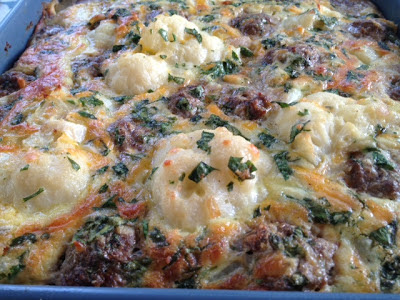
Cauliflower and Meatballs Gratin

This is another dish that I came up with while trying to use up leftovers. I had some seasoned uncooked hamburger meat in my fridge from making my spaghetti sauce with meatballs the night before and I had to use it before it spoiled. The only problem was that I didn't have enough to make a meal out of it so I knew that it needed to be stretched by mixing it with something else and then cauliflower gratin came to mind!

The meatballs need to be about as small as a big grape so that they can be cooked to a safe temperature by the time the whole gratin is ready. The meatballs have my usual seasoning (minced onion/chopped cilantro/cumin paprika pepper and salt) but you can use your own seasoning if you prefer.

The recipe for the cauliflower gratin can be found here just add your seasoned meatballs to the cauliflower before pouring the egg and cream mixture evenly.


Enjoy!

Tuesday, July 31, 2012

Marinated chicken skewers

I tend to go for my number one marinade for chicken skewers most of the time since I am always sure of the outcome: tender and deliciously tangy chicken. This time I decided to try something new and wanted to stay away from the flavor I am used to. After a quick research on the Internet I got inspired to make a combination of a few recipes to come up with flavors that would compliment each other.

Verdict? This marinade is a keeper since it produced delicious, very tender chicken...I will be making it over and over again. Do try it and you will see what I am talking about.


Ingredients:

I used these ingredients for 3 big boneless skinless chicken breasts

3 tablespoons mayonnaise (light is fine)
1and 1/2 tablespoon Dijon mustard
1 minced shallot
1 teaspoon dried oregano
1 teaspoon lemon juice
2 tablespoons olive oil
1/2 teaspoon garlic powder
1 teaspoon paprika
1/4 of a bouillon cube
salt and pepper to taste

Mix all the ingredients and marinade the chicken for at least 3 hours in the fridge.

Enjoy!

Saturday, July 14, 2012

Scallops over pasta

I bought these beautiful scallops during my trip to the fish market, they looked very fresh so I knew that I wouldn't be messing with them too much when cooking. Scallops have a very delicate taste that gets lost when mixed with spices and herbs so it's best to keep it simple.

The exception to the rule is:  if you are using scallops that are less than fresh then they probably don't have that much taste and will need some help so feel free to use a marinade or sauce to flavor them.


Directions:

Wash your scallops and dry them on a paper towel from both sides.
salt and pepper both sides
Heat a skillet; it's very important that it is very hot so that you don't end up with steamed scallops
Add butter once the skillet is very hot to cover the whole surface (about 1 tablespoon)
Sear one side until golden brown and turn to the other side and do the same.
Scallops should never be over cooked otherwise they turn into rubber :-( they are not very cheap so stay close to that pan.

I served my scallops over spaghetti with a delicious pink sauce (tomato/cream) and notice how I didn't pour the sauce over the scallops to preserve their distinct taste.

Enjoy!

Wednesday, July 4, 2012

Baked red snapper

I love fish and I try to include it in the menu at least once a week and I would cook it a lot more if a fresh fish market was anywhere near my house.
We made a special long trip to a fish market the other day to get some goodies and I was almost as excited as I would've been in a french patisserie :-) I had to bring this big boy home with me and eventhough my son was concerned about the "organic" looking finished product (head and tail anyone?) he was relieved to know that they are not supposed to be eaten and he actually ended up LOVING it.


Directions:

Clean your fish and make three cuts on each side (makes it absorb the sauce)
Slice some potatoes, peppers.
Make the marinade/sauce: chopped cilantro, garlic, puree of 1 tomato, 1tbs tomato paste, cumin, paprika, salt, pepper, half a bouillon cube, 1 tbs lemon juice.


Place the veggies in the bottom of your cooking vessel, rub your fish with the marinade and place it on top of the veggies. add 2 tbsp of water to the remaining marinade and pour it all over the veggies (fish releases water so don't add more). You can add olives if you prefer. Decorate your fish with sliced lemons and tomatoes.
bake in a 375 oven for 45 minutes or until done (depends on the size of your fish)

Right before going in the oven...


...And after...Yummy!

Stuffed kefta

Happy 4th of July!!

Burgers and hot dogs are great and all but this 4th of July I decided to make something a little different so I gave these stuffed sliders a go and I didn't regret it. The spices used on the burger are the standard moroccan mix that make a burger become a kefta :-) but the twist is that each slider was stuffed with a little feta cheese and a quarter of a boiled egg Yes it sounds odd but it is delicious!!


And here's a look at what's inside


directions

mix the hamburger meat with chopped cilantro a very finley chopped onion (I grate mine) paprika, cumin, pepper and salt.

Shape into balls and flaten each ball in the palm of your hand, add a little feta cheese to the center and top with a quarter of a boiled egg. Bring the sides of the circle that you have formed to the middle and shape your kefta into the shape shown in the first picture. cook on the grill.

We had some cranberry/sprite to drink and I added some of my strawberry ice cubes that were very fit for the occasion.


Stuffed vegetables

To look at this blog you would think that I do a lot of baking and not enough cooking but that couldn't be further from the truth! I actually cook a LOT more than I bake but I find that baked stuff looks a lot prettier in pictures :-) plus I use this blog to save my recipes and I am never worried about saving cooking recipes because I eyeball everything and I can say that I am very experienced in that area...Baking however is not as easy to eyeball and is more of an exact science so I always hurry and register a succesful recipe before I lose it...That's my excuse and I am sticking to it!!

I made some stuffed vegetables last week that came out really delicious and I remembered to take a picture before serving them and I am glad I did because they were gone as soon as they hit the table lol my husband and kids loved this dish so much that I was wondering why I hadn't made it for months.


My kids only especially love the stuffed potatoes


I find that stuffed peppers cooked in the oven come out too crispy and if you let them cook until tender the stuffing becomes overcooked and dry so the best way for me to cook them is in a pressure cooker with some tomato sauce.

Directions:

Mix some chopped cilantro with 1 grated onion, paprika, cumin, salt, pepper and some cooked rice. Mix well with the hamburger meat and set aside in the fridge.

Using a slim knife, empty the inside of the veggies and stuff with the meat mixture.

Heat some canola oil in a pressure cooker and add a thinly sliced shallot (or onion) once the shallot has wilted add 2 fresh crushed tomatoes add salt pepper cumin paprika half  bouillon cube and a little saffron for color.

Add a few tablespoons of tomato sauce and a little water and place the vegetables in the pressure cooker. Cook for 25-30 minutes.

Enjoy!


Sunday, April 15, 2012

Lemon chicken with home made fries (djaj b les frites)

Some of my best memories from my childhood involve food, I remember sneaking into the kitchen while my mom was making the fries to top her lemon chicken and grabbing a handful as a little appetizer before the meal was served...She would always chase me away and tell me that I would be too full for the meal (I was never too full for anything she made LOL)

This combination might be unfamiliar if you've only known french fries as cheeseburger's best friend (which is very true!!) but those yummy fries have been around the world and made other friends too!!

You can find the recipe for the lemon chicken here, just add home made fries and serve with some bread for soaking up that sauce.

Sunday, April 1, 2012

Tagine style cooking

After the brief introduction in Tagine 101 I am now going  into more details and step by step instructions on how to use this cooking method. I will be referring back to this post on future tagine recipes so I wanted it to be as detailed as possible.

 If you are looking for something you can quickly throw together for dinner, this is NOT it...If you're looking for a succulent dish with an exotic blend of flavors and are ready to open up your kitchen to a far away world then this would be it!!

Pictured below is a lamb tagine with carrots and potatoes

The steps pictures in the step by step instructions are from a beef tagine with fennel and potatoes
My way of cooking tagine is not too traditional; only because I cut the cooking time by first cooking my meat in a pressure cooker and then transferring it to the tagine and building the layers of ingredients on it. This is my mom's way of making it and there are many ways of preparing it depending on different regions and even families.

Steps 1 through 4 can be used to make many kinds of lamb or beef tagine so you can change the vegetables you choose to top it with.


Step 1:

Heat up some canola oil in your pressure cooker (about 4 tablespoons) and add your meat, quickly start adding your spices (pepper, salt, cumin, paprika, ginger, saffron, cinnamon) and stir until it is nice and brown all over.
Add water; you want it to slightly cover the meat and cook for about an hour or an hour and 15 minutes (depending on what cut you choose)

Tip: Spices are good, over usage of spices is bad...You want your blend of spices to compliment your other ingredients not to completley mask and overwhelm them. Please go light on the cinnamon, it needs to be one pinch in this savory recipe (we're not making cinnamon rolls here ok?! LOL)

Another spice that tagine calls for is (Rass el Hanout) which you will not find in your grocery store, if you can get your hand on it great! (use 2 pinches as it's strong) if not then just do without it.

Step 2:

After your meat has cooked, transfer it to the tagine but before you do so you will need to protect it by lining your tagine with either some old utensils or bamboo skewers as shown in the pictures.

Add the sauce from the pressure cooker to the tagine and at this point you will not have the stove on; you will wait until you assemble all the other ingredients on top before you do that.


Step 3:

Get the basic tagine ingredients ready; compare these to a "Mir aux pois" in a soup or a bouquet garni...Meaning that you build your tagine's flavors based on these ingredients:


-Cilantro
-Tomatoes
-Onions
-Garlic (about 3 minced cloves)
-Bouillon cube (I use Knorr)

First add the onions and 1 minced garlic clove with half the bouillon cube, then follow with tomatoes and cilantro. Finish by adding the rest of the garlic and bouillon cube directly on top.
If you're using olives you can add them at this point.


Step 4:

Add the vegetables you chose to make your tagine with; I half cook mine before placing them in my tagine so that by the time the onions and tomatoes are cooked my other vegetables would be ready too (this keeps the flavors fresh)

My favorite combinations to add to my tagines are: peas and potatoes/Carrots and green beans/ peas and artichokes and potatoes and fennel (as pictured)


If you're not familiar with fennel you really need to give it a shot; it is so delicious and fragrant. You only use the bottom part in the tagine (as pictured)


Step 5:

Now that you have assembled your tagine you will place the lid on it and let it cook. It needs to cook on a low heat until the onions are cooked and your topping vegetables are tender (remember that the meat is already cooked). While your tagine is cooking you want to arroser it from time to time (fancy talk for getting some of the sauce over your vegetables so they can absorb the flavor)

If you find that you have a lot of sauce in your tagine and it starts bubbling over the edges, simply place a spoon between the lid and the bottom to let it blow off some steam and reduce.

Enjoy! 


Sunday, March 25, 2012

Tagine 101

Tagine is one of Morocco's and North Africa's most famous dishes. The name refers to both the earthenware pot in which you cook and the dish that you are making...Explanation? Ok, you can say" I need to buy a tagine because I feel like making a tagine!" So there, it means both, the pot and its content.

Why cook in a pot made out of clay when you have stainless steel and non stick pots? Easy answer: Flavor! and lots of it...I am a big fan of this cooking method which uses a minimum of water (thanks to the cone shaped cover that trapps moisture in) and gives you a kind of stew (It hurts to call it stew because it's not) with very earthy flavors . My mom is the best tagine maker and I learned a thing or two from her. Below is part of my tagine collection; some of them are just for serving (The decorative ones) and some are for cooking. Now all these hang around my kitchen and look pretty until I decide that it's time to put the stainless steel away and get some clay out!!


I will follow by detailed step by step directions on how to cook a basic tagine but I thought it's necessary to have this post as a little introduction. You can buy your own tagine on line or become really good friends with me and I'll see what I can do LOL

Saturday, February 25, 2012

Moroccan style chicken with potatoes

Contrary to common belief moroccan food is not spicy, it's rather well seasoned when prepared the right way.
This dish is a very good example of that; it's well seasoned without being overwhelming. I cook it in a pressure cooker to save time but it can be prepared in a regular covered pot.

The directions are going to be a little long but that's because I am trying to go into more details when explaining this dish and giving lots of tips.


Directions:

Cut your chicken into 4 quarters or if you bought it already cut up just wash it.

Tip 1: I have a special way for cleaning chicken that I learned from my mom (doesn't apply to skinless chicken) If you've ever smelled a raw chicken you've probably noticed that it doesn't smell great (especially the skin) so to get rid of that smell (this improves the overall taste) I first wash it under running water and then put it in a container and pour some lemon juice over it, I rub the lemon juice all over it and then I sprinkle it with salt and rub it in circular motions (think exfoliating massage for chicken LOL) rinse the chicken thoroughly under running water and now you're ready to cook it.

In a big bowl, mix some chopped fresh cilantro (about 2 big tbsp for one chicken) add 2 minced garlic cloves, paprika, salt, pepper, half a bouillon cube (I use Knorr brand), 1/2 tsp minced fresh ginger and 3 tbsp olive oil add the chicken to this mixture and rub it very well. You can keep it in the fridge overnight to soak up the marinade or cook it right away.

Tip 2: Fresh ginger gets spoiled within a few days of purchase and if you don't use it in too many recipes, you will find that most of it will end up in the trash. When I buy my ginger I wash it, cut it in pieces of about 2 inches, put it in a ziploc bag and keep it in the freezer. All I have to do is get it out and grate it on the cheese grater while still frozen.

Heat your pot and add the chicken and marinade to it, let the chicken brown lightly on all sides while making sure that you don't burn your marinade so you need to use your wooden spatula to stir the bottom of the pot. Add 2 medium oninons cut in thin slices and allow them to wilt while you stir from time to time (keep the pot uncovered up to this point) you can add 1/2 a preserved lemon and some olives if you like (I do) and water (depending on quantity and cooking vessel) cover and cook until chicken is tender.

Tip 3: Preserved lemons can not be replaced by regular lemons (too bitter) these are a very moroccan ingredient that is commonly used with chicken but can also be used with meat dishes. I don't make my own I just ask anyone who's going to Morocco or coming to visit to bring me a jar as a gift (I wait for them to ask me what I want them to bring me back of course) they give this very speicial flavor to chicken but your dish will still taste delicious even if they're not used.


I steam my potatoes in the steaming basket that comes with my pressure cooker while the chicken is cooking and just take them out about 15 minutes into the cooking (potatoes cook a lot faster than chicken).

Tip 4: You can cook your potatoes in the sauce; this is actually the common way of making this dish. Add your potatoes when you see that the chicken is half way done and let them finish cooking together.

Uncover to reduce the sauce.

Serve your moroccan meal with some bread for soaking up the sauce!

Saturday, February 11, 2012

Baked salmon with shrimp and spinach sauce

As much as I would love to take my time in the kitchen and spend hours cooking and baking, reality is...I only have a few minutes to put something on the table after a long day at work, so I am always trying to come up with short cuts or quick recipes like this baked salmon with shrimp and spinach sauce.

It took me exactly 30 minutes to prepare this dish and that's including prep and cooking time. Perfect for weekdays!!


Directions:

In a small bowl prepare the coating that will cover the salmon before it goes in the oven

This quantity was enough for 3 big pieces
1tbsp of mayonnaise (it keeps the salmon moist and light mayo is fine)
2 tbsp of olive oil
Paprika
Salt/Pepper

Rub your salmon pieces with the mayo mixture from all sides, mix some bread crumbs (I use italian) with some parmesan cheese and sprinkle the top of each salmon piece generously.
Bake for 20 minutes (this is a magical cooking time for salmon and it's never dry when I stick to it)

Now that your salmon is in the oven it's time to make the sauce, chop one small shallot and sautee it in some olive oil.
Chop some baby spinach (I used the whole bag) and add it to your skillet with some salt and pepper.
Add shrimp and continue sauteeing until it's cooked
Add heavy whipped cream (about 5 tbsp) and 1/2 teaspoon of flour (to thicken the sauce) and let it simmer for 2 minutes.

Serve your sauce over the salmon and enjoy!!

Sunday, February 5, 2012

Chicken and shrimp brochettes

My menu for the super bowl just had to include some grilling action! The marinade I used is the easiest thing to make and gives chicken and shrimp alike a very fresh and tangy flavor.


Ingredients:

Cilantro (always fresh in all my recipes)
Cumin
Paprika
Salt/Pepper
garlic powder
Lemon juice (3 oz)
Olive oil (4 oz)

Directions:

  • Clean your chicken breasts and cut them into cubes
  • Clean the shrimp and set aside
  • Chop cilantro and place in a bowl, add spices, garlic powder and about 3oz of lemon juice and 2 oz of water and mix well.
  • Add this mixture to the chicken cubes and to the shrimp (keep in seperate containers)
  • Place the containers in the fridge until ready to grill (overnight will only taste better)
  • Once ready to grill, add olive oil and mix until all pieces are coated
  • Tip 1: holding off on adding olive oil helps the chicken and shrimp absorb the marinade better when you don't have time to wait for it to penetrate so if you're preparing the brochettes for the next day, you can add your olive oil to the marinade and no water.
  • Tip 2: If you don't want your bamboo skerwers to burn like mine did in the picture; soak them in water for 30 minutes...Umm I didn't have time :-)
Enjoy!

Saturday, January 28, 2012

Grilled chicken with creamy portabello sauce

I follow one of two different methods when making grilled chicken; I either make a good marinade and let the chicken absorb the flavor from it for a few hours in the fridge and just grill it when it's time to eat, or I leave the chicken plain with just some olive oil salt and pepper and take the time to make the sauce that goes over it once it's grilled and gives it all the flavor it needs.

This sauce is so delicious and always gets two thumbs up from the whole family!


  • Clean some portabello mushrooms (Just wipe them with a paper towel) and cut them into thin pieces
  • Grate two halves of one big tomato to get puree
  • Chop about 1 tablespoon of cilantro (optional) and Chop one shallot
  • Heat up 2 tablespoons of olive oil in a skillet and add the shallots
  • Cook until soft and add mushrooms, salt and pepper and continue sauteeing it until the mushrooms are tender
  • Add the fresh tomatoe puree (Not the canned stuff please) add cilantro and a little bit of water and cover.
  • Let it simmer for about 5 minutes and add 1/4 of a teaspoon of flour to help the sauce thicken, stir immediately after you add the flour.
  • Add about 6 tabelspoons of heavy cream and let it simmer for 3 to 4 minutes.
  • Salt and pepper the Chicken breasts (thin slices) coat in oil and grill
Serve the chicken with the sauce over it and enjoy!

Monday, January 23, 2012

Fettuccini with chicken in creamy tomato sauce

My husband swears that I am half italian whenever I make pasta; my sauces are really good if I may say so myself!
This "pink sauce" has the tanginess of a tomato sauce and the creaminess of a white sauce without being heavy and is incredibly delicious!!
I don't give exact meansurements for ingredients when it comes to savory recipes as it depends on the amount I am cooking and how much each person likes certain spices.


Directions:

Heat up two tablespoons of canola oil in a pressure cooker (or a regular pot if you have time) add clean cut up chicken pieces (I use legs and thighs) and add spices (salt, pepper, paprika, half a buillon cube) brown the chiken on both sides. chop one shallot and add to the pot, cut one big tomato in two halves, grate the insides on a cheese grater or pass in food processor to have tomatoe puree and add to the pot.

Let the shallot and tomatoe cook for about 2 to 3 minutes while you stir from time to time so nothing sticks to the bottom.

Add one big can of tomatoe sauce to the pot and some water and cover, cook until the chicken is tender (20-30 minutes in pressure cooker) and you can add a little water if you see that your chicken needs more time to cook. Uncover to reduce the sauce (you can add some cilantro at this point) and add about 5 tabelespoons of heavy whipping cream. Let your sauce simmer for about 2 minutes.

Cook your pasta to your preference, drain, add sauce and place chicken pieces on the top.